Ch. 2 Installation and Setup
Tooling for System Descriptor language is provided in the form of a custom Eclipse installation. Once installed, Eclipse can be used to create and edit SD models. Two items must be downloaded to continue:
- the base Eclipse installation for either Linux or Windows
- the System Descriptor language update site
Note that the latest versions can be located on the GitHub releases page.
Setting up Eclipse
- Unzip the Eclipse zip to any location you wish.
- Start Eclipse:
- Windows: double click
eclipse.exe. - Linux: cd to the directory in which you unzipped eclipse and enter
./eclipse. - If Eclipse fails to start, see Eclipse Troubleshooting below.
- Windows: double click
- Choose any directory when Eclipse prompts for the location of its workspace.
- optional: On the bottom right of the Welcome tab unselect Always show Welcome at start up and close the Tab.
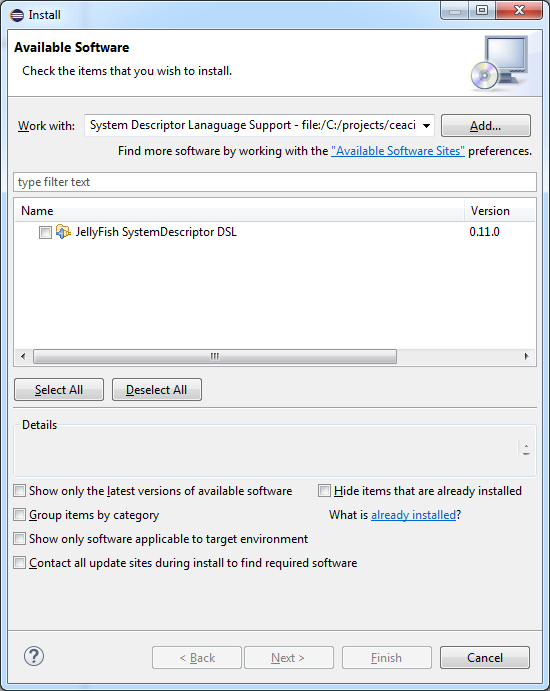
- Install the SD update site once eclipse has started.
- Select Help → Install New Software.
- Click Add… to create a new software site.
- Name the site System Descriptor Language Support (note this name can be anything).
- Select Archive…
- Navigate to the directory where the update site zip is located.
- Select the com.ngc.seaside.systemdescriptor.updatesite-
.zip (note that denotes the version you downloaded). - Select Open.
- Select OK.
- Unselect Group items by category at the bottom
- Unselect Contact all update sites during install to find required software.
- Check JellyFish SystemDescriptor DSL.
- Select Next and follow the prompts.
- Restart Eclipse when prompted.
Eclipse Troubleshooting
If Eclipse fails to the start, it is usually because Eclipse is using an older version of Java. It may be neccessary to
configure the Java executable Eclipse uses when starting. In most cases, you can configure your system so a Java 8 JDK
is installed and that JDK is listed first on the $PATH envionrment variable. If you cannot configure the $PATH
for you system, you can edit the eclipse.ini file. Add the lines below:
eclipse.ini
-vm
<PATH_TO_YOUR_JAVA_EXE>
These lines must occur direclty after the openFile line. Include a full path to the java.exe executable. Below is
a complete example.
eclipse.ini
-startup
plugins/org.eclipse.equinox.launcher_1.5.0.v20180512-1130.jar
--launcher.library
plugins/org.eclipse.equinox.launcher.win32.win32.x86_64_1.1.700.v20180518-1200
-product
org.eclipse.epp.package.dsl.product
-showsplash
org.eclipse.epp.package.common
--launcher.defaultAction
openFile
--launcher.defaultAction
openFile
-vm
C:/java/jdk1.8.xxx/bin/javaw.exe
--launcher.appendVmargs
-vmargs
-Dosgi.requiredJavaVersion=1.8
-Dosgi.instance.area.default=@user.home/eclipse-workspace
-XX:+UseG1GC
-XX:+UseStringDeduplication
--add-modules=ALL-SYSTEM
-Dosgi.requiredJavaVersion=1.8
-Dosgi.dataAreaRequiresExplicitInit=true
-Xms256m
-Xmx2024m
--add-modules=ALL-SYSTEM
Cleaning the Project
Sometimes, Eclipse will show errors in files even if the files are syntacticallyd valid. This is expecially true when importing other types of data types. When this happens,
- Select Project -> Clean.
- Select Clean all projects.
- Clock Clean.
- After cleaning, right click a project in the Package Explorer and select Refresh.
This should remove the errors. If all else fails, restart Eclipse.
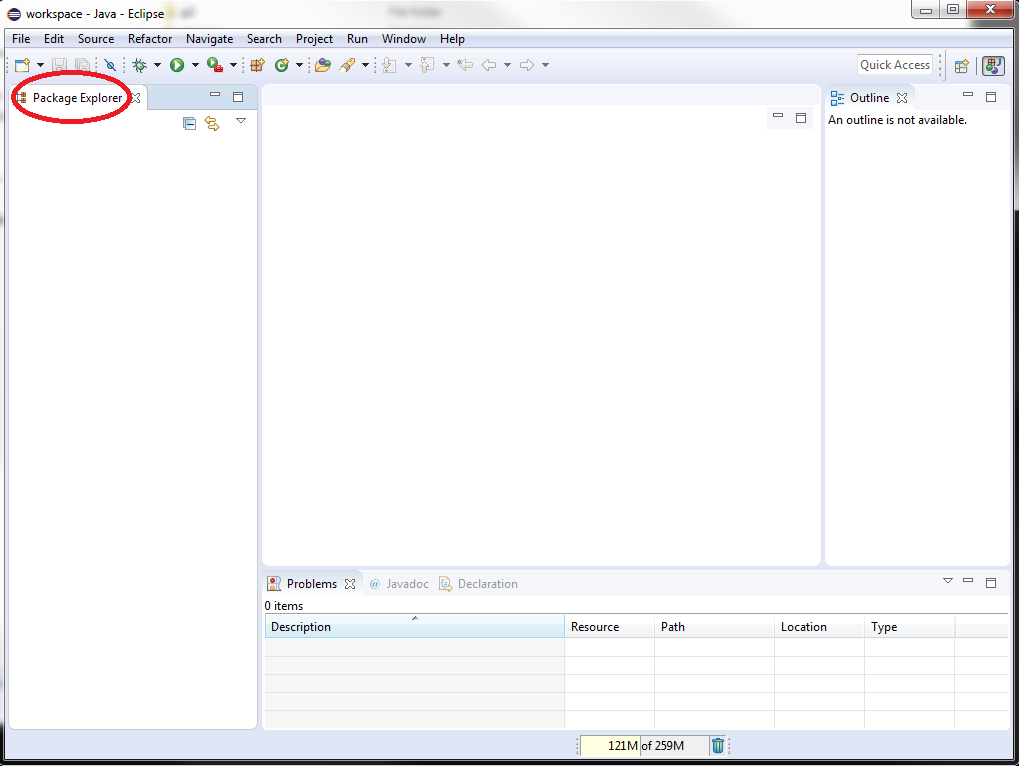
Creating an Initial Project
Once Eclipse has a restarted, an initial project can be created to make sure the installation was successful. Make sure the Package Explorer window is visible and follow the steps below. If for some reason Package Explorer isn’t shown (or you accidentally close it) just select Window -> Show View -> Package Explorer in the menu.
- Select File -> New -> Other in the menu. You may also right click in the Package Explorer and select New -> Other.
- Expand JellyFish
- Select System Descriptor Project
- Select Next.
- Enter a project name of HelloWorld.
- Leave Use default location checked
- Select Finish.
A new project should appear in the project explorer.
- Expand the
HelloWorldproject and expandsrc/main/sd - Expand the item labeled
com/ngc/mysdproject - Double click
MyModel.sdto open the example model
Its contents should look something similar to this:
MyModel.sd
/*
 * ...
 * [license header]
 * ...
 */
package com.ngc.mysdproject

model MyModel {
  metadata {
    "name" : "MyModel",
    "description" : "MyModel description",
    "stereotypes" : ["model", "example"]
  }
}
This indicates that the tooling has been successfully installed.
Customization
Some defaults values that are generated when creating a new System Descriptor project can be modified by creating
a jellyfish.properties file. This can be done as follows:
- Navigate to your home directory. This is typically
C:\users\<user>for Windows and/home/<user>for Linux. - If it doesn’t already exist, create a folder called
.jellyfish. If you get an error in Windows, type.jellyfish.instead. - Create the file
jellyfish.propertiesin the folder.jellyfish. - Open the file
jellyfish.propertiesusing your favorite text editor. - You can add properties to this file using the following syntax:
<property>=<value>. Each property should be on its own line.
The following defaults can be changed using the jellyfish.properties file.
| Property | Value | Description | Example |
|---|---|---|---|
| jellyfish.generated.header.file | The file path to the header file | Customizes the header/license that Jellyfish uses when generating files or creating a new System Descriptor project | jellyfish.generated.header.file=C\:/users/<user>/team-license.txt |
| jellyfish.generated.gradle.url | A URL to a Gradle distribution zip | Customizes the URL to the Gradle distribution that Jellyfish generates when creating a new System Descriptor project | jellyfish.generated.gradle.url=https\://services.gradle.org/distributions/gradle-4.9-bin.zip |
Special Characters
If a value has a colon `:` or backslash `\` character in it, it must be preceded by a backslash `\` character. For
example, the header file `C:\users\me\license.txt` should be
`jellyfish.generated.header.file=C\:\\users\\me\\license.txt` in the properties file. Conveniently, you can use forward
slashes `/` for Windows file paths instead: `jellyfish.generated.header.file=C\:/users/me/license.txt`